-

- Forums
- Chatrooms
- Gallery
- Gameplay Videos
- Upload
- Articles
- Mod Reviews
- Shop SP: Games, Movies, Books
|
|
HIGHCLIFF CASTLE RUINS
Adventurous Children
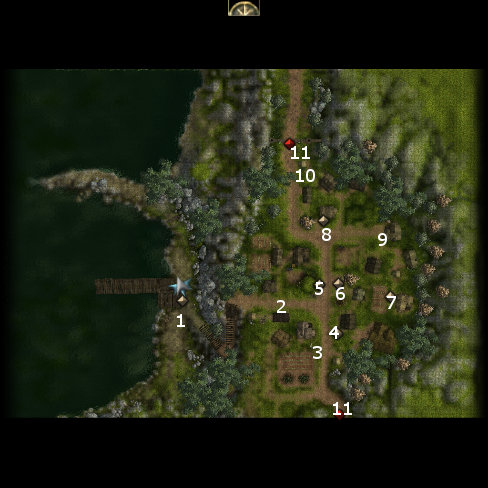
So first I speak to Gera and Zachan, who can be found at #4 on the Highcliff map:
How I respond to their plea for help can have repercussions for influence with my companions. If I responded callously, it will win influence with Neeshka but lose it with Elanee. If I respond sympathetically, I gain influence with Elanee but lose it with Neeshka. It ultimately doesn't matter that much since there will be plenty of opportunities to gain influence with both of them, but I chose the latter as a roleplaying decision.
*Evil* However, when Neeshka objects, Zarathos gains influence with her but loses it with Elanee by suggesting that he's only doing it for the sake of a reward.
I start off at #5 on the south end of the Highcliff Castle map:
I then go on to #2 towards the south side of the map, where I kill several Wolves. The strategy is typical, let Khelgar stick his neck out, then Valeria and Neeshka can flank and sneak attack once the formation sets. I repeat the process at #3 on the map. I then speak to Andrew and convince him and his buddy to go home. I continue to kill more Wolves at #2 on the north side of the map.
I return to Gera and Zachan with the good news, and get 200xp and Zachan's Amulet (+1 Constitution, +1 Wisdom). I could get some gp, but I decline to do so as a roleplaying decision (i.e. Valeria wouldn't take advantage of an elderly couple). There are plenty of other opportunities to score gold anyway.
William's Fate
Now I speak to Juni at #9 on the Highcliff map. She wants me to find her missing husband, William. William can be found at #1 on the Highcliff Castle map. I get 75xp just for finding him. There's more than one way that I can play this. The good party uses a Diplomacy (or Intimidation) check to convince him to go back. I then speak to Juni again and get 75xp as an additional reward.
*Evil* William's Fate
There's also a different way to resolve the quest involving Juni and William. Accept William's counter-offer of 100gp to lie to Juni and say that he's been killed. Then go back and spin the lie to Juni back in Highcliff for another 200gp. You'll get less xp for it, 75 in fact, but more gold.
Slaan
Now I travel to #4 on the Highcliff Castle map. There I find an enormous Lizardman named Slaan battling several Zombies. I kill the Zombies, whereupon Slaan offers an alliance. It is more xp overall to simply kill him though, as it means I get to kill the rest of the Lizardfolk as well. I click on his body to find Gloves of the Yellow Rose +1 (+1 attack, +1 electrical damage) and a map that reveals the location of the Lizardfolk caves. There will be more Zombies to kill on the left side of the castle.
I have no use for the Gloves. Once Khelgar becomes a Monk, I'll buy a much better pair that will be available for sale by then.
Mozah's Backpay
The video starts with Valeria speaking with Mozah near the gate at the north end of Highcliff (#10). He wants me to look out for some gold that was promised to him by adventurers that he led to Highcliff Castle. I make my way inside the castle itself, and end up at #1 on the Highcliff Castle Ruins Map. I buff up before I go in, including Barkskin for everyone.
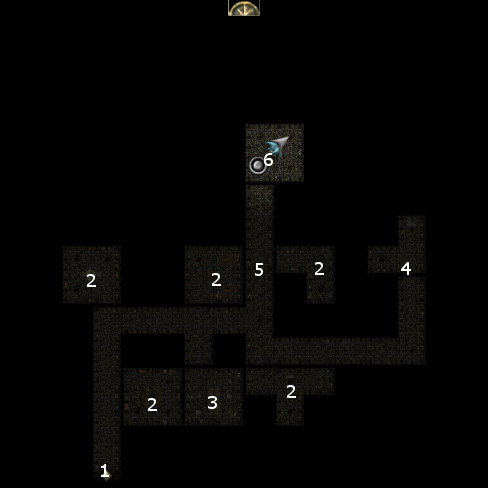
The places marked by #2 will have several Zombie Warriors. They're tougher than the other Zombies I've encountered so far, but by now a decently equipped and buffed-up party should be able to take care of them in melee combat.
I inch east along the main hallway. Valeria buffs herself up with Mirror Image, Ghostly Visage, and Bladeweave.
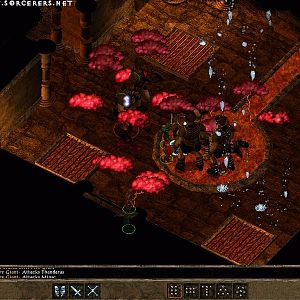
At #3 will be a Shadow Priest and four Zombie Adventurers, who attack after the Priest has a conversation with Black Garius. The Zombie Adventurers are even tougher than the other Zombie Warriors I've been fighting in the Ruins. The Shadow Priest is capable of using a spell that uses negative energy over an area of effect similar to Fireball, with the result that it will both damage party members and heal the Zombie Adventurers at the same time. It is thus imperative that I take out the Shadow Priest first and foremost, so I train Khelgar and Neeshka on him. I also train Valeria on him, with the hope that she can prevent his spellcasting by Dazing him through her Bladeweave effect.
Elanee carefully positions herself in order to catch the Priest and all four Zombies with two castings of Call Lightning, but without damaging any of the containers. They're softened up and much easier to kill at that point.
The Priest leaves behind an Amulet of Vitality (+2 Constitution) and a book called the Fundamentals of Protection for the Self. The chest behind him has Nasher's Nimble Boots (+3 Dexterity) and a Darksteel Warmace (+1 electrical damage). I save up the Boots and the Amulet for Shandra, since she'll wear them together as part of her particular item configuration.
One of the Zombie Adventurers leaves behind scrolls of Least Spell Mantle and Melf's Acid Arrow. Valeria will inscribe the latter scroll.
One of the Zombie Adventurers leaves behind Mozah's Backpay. I then return to Mozah in Highcliff. There's no alignment consequence for lying to him, so I do that in order to both keep the 500gp and the 125xp quest bonus to boot.
Lizardfolk and Zombie Warriors
I return to the Castle and begin clearing out the rest of the Zombie Warriors. This includes a spot at #4, where there are various containers with plenty of random loot. It also includes a spot at #5, when two different Zombie groups will attack. I stay south, and let Elanee hit the first group with a Call Lightning. By the time I've finished off the first second, the slow moving second group will only have started to close in, so Elanee obliges with a second Call Lightning.
The hallway north of #5 will have a trap that needs to be disarmed. There will be a few Lizardmen on the other side of the locked door at #6. They're easy enough to kill.
7th Level
Here is where Valeria and her companions advance to their 7th level of experience. One highlight is that Neeshka acquires the Martial Weapon Proficiency feat, which allows her to equip the Kukri +2 that Valeria had given her.
Another highlight is that Valeria gets her 2nd Swashbuckler level, and therefore also a +1 Grace bonus to Reflex saving throws which will augment her Evasion ability.
Now it's on to the Lizardfolk Cave.